

Do It Yourself Car Paint Repair
Chips in your car's paint aren't just an eyesore. They can also expose your car's metal to further corrosion. You may not be able to make your auto's finish look showroom fresh, but with a reasonable level of competence, you tin make your car look much ameliorate and prevent further rust germination without an expensive trip to the torso shop. Hither'south how.
Tools You May Need for Chip Repair


Step ane: Touch Up Kits

Duplicolor has uncomplicated pigment touch-up kits that you can buy at your local auto parts store, and many dealerships can sell you a paint pen in your auto's exact factory color. Y'all can as well purchase more than involved affect-up kits and supplies online. For instance, the kit we tested from PaintScratch came with primer, clearcoat, paint thinner, a canteen of rubbing compound, and color-matched pigment.
PaintScratch used information in the car'south Vehicle Identification Number—the long philharmonic of letters and numbers commonly referred to every bit a VIN—to verify the right shade of paint, which is a pretty common do. These kits are more than expensive and have more steps, but ultimately provide a better, longer lasting consequence.
Step 2: Cheque the Door

Y'all need to place the paint lawmaking for your vehicle to ensure yous are getting the right shade of pigment, which is easy to observe if your machine has never been repainted a unlike color. On most cars built since 1983, this information may be plant on a sticker on your commuter's door or door jamb. To be absolutely sure of a match, the paint vendor may also demand the VIN, which can be establish on that same door sticker or on the VIN plate on your dash.
If your motorcar has been repainted a different color in its lifetime, you lot'll obviously need to notice that colour instead. Hopefully that color is listed somewhere in the records for the car, but if non, y'all'll likely want to shop for paint in person to make certain y'all're getting a practiced friction match.
Step 3: Go Shopping

Preparation is the key to getting good results. Yous'll demand very fine m-grit, 3M Wetordry sandpaper, various craft sticks, cotton swabs, thin-tip splinter tweezers, glue dots, and diverse paper punches. Everything except the tweezers came from a local arts and crafts store.
This content is imported from {embed-name}. Yous may exist able to find the same content in another format, or you may be able to notice more information, at their spider web site.
Step 4: Making Your Sanders

Virtually off-the-shelf sanding tools would damage a lot of perfectly fine paint effectually the bit, so we'll need to make our own miniature sanders. Use the punches to cut out pocket-size sandpaper circles and glue them to the arts and crafts sticks and dowels. Don't exist afraid to call up outside the box at the craft store, either. Nosotros establish a $1.99 pocketbook of wooden axles with nice rounded ends that worked well on larger chips.
Step v: Launder the Car

First, wash the car with warm soapy h2o, rinse thoroughly, and permit it dry. You want to be sure the car is completely free of dirt in order to go a shine repair.
Footstep vi: Remove Built Upward Waxes and Coatings

Adjacent, remove whatsoever wax, grease, and silicone that would prevent fresh paint from adhering to the surface of your automobile. PPG Acryli-Clean is one such solvent that'due south safe for this, and tin exist found at professional body shop stores and some larger auto parts stores.
Stride 7: Fill Minor Chips

For very small-scale chips, we recommend using a paint pen. The pocket-size tip on the Duplicolor paint pen was easy to command and made filling the divot easy. Apply enough paint that information technology rises barely to a higher place the surface. This allows for shrinkage during drying, and any slight excess tin be wet sanded downwards and then rubbed smooth.
Most rock chips are probably on your hood'south leading edge. To foreclose the paint from running earlier it dries, you can lift the hood until the chip is horizontal to the ground to go along the paint in its place even while wet.
If these are the only chips your auto has, yous're lucky! Otherwise, read on.
Pace 8: Clean Upwardly Medium Chips

If your remaining chips are larger, skip ahead to Step 11. For medium size fries, nosotros'll need to use the brush applicator. Before your beginning brushing on anything, clean out any loose debris and paint from inside the scrap with your tweezers.
Step 9: Apply the Primer
Apply the primer with the applicator castor as directed. It's important to read and follow the instructions, as these can vary between paint vendors. Pay shut attention to how long it will take for the pigment to dry for each layer, be information technology primer, paint, or clearcoat. Working over wet paint could go out crude spots, bubbling or holes in the finish, which wouldn't do as much to protect or heighten the appearance of your car.
Step x: Apply the Paint

After the primer cures, utilise the paint. At this signal, the filled chip on our test car didn't look too bad from six feet away. Wet sanding, applying the clearcoat, wet sanding again, and then rubbing the bit shine improved the look of the repair considerably. Later that, the repair looked great from about three anxiety away, depending on your eyesight and the amount of sunlight. You'll have to determine how much work you lot desire to invest hither.
Step 11: Clean Upward Big Chips
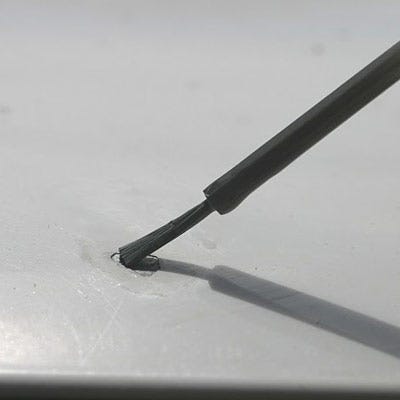
The residuum of these steps are for fixing large paint chips, which are the ones most likely to expose the car's bare metal to the elements and lead to farther damage. On larger chips and those that already have a rust colony growing, use the splinter tweezers or a fine dental selection to flake off any loose paint.
You must exist very careful because y'all can easily turn a minor chip into a large i if you loosen up any paint that isn't loose already. However, if you don't remove the loose paint, the paint will somewhen fleck off on its ain and spoil the repair.
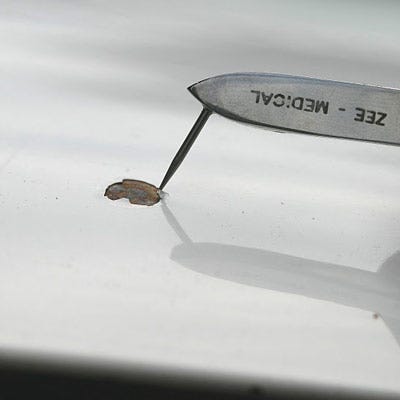
Pace 12: Remove Rust

Swab CLR, Ultra 1'south Safest Rust Remover, or an equivalent rust remover into the scrap to deliquesce and remove rust. Keep doing this until your swab comes up make clean. Adjacent, rinse the rust remover out of the flake with isopropyl alcohol. If you don't remove all the rust, the paint won't properly adhere to the car and rust will spread under the paint.
Pace 13: Sand the Edges

Carefully dry-sand the edges of the chip until they wait smoother and more rounded off. You don't want whatsoever sharp edges that will brand the repair look more obvious. The curved shape of the wooden axle end made information technology the ideal tool for this. H2o will restart the rust process, then do this sanding dry. The 3M Wetordry sandpaper clogs quickly when used for dry out sanding, but the adhesive dots make changing sanding circles easy.
Step 14: Apply Leverage

Now is the time to whip out a flat craft stick to use with a small circumvolve of sandpaper. Using the edge of the flat wood sanding stick will apply more than leverage when sanding the scrap and the area around information technology, but don't sand too far outward or you'll sand through the clearcoat and brand the spot more noticeable.
Yous want to taper the edges of the chip so the boundaries of your repair are less noticeable. Brand certain you wipe or accident off the remnants of your sanding job before moving on to the adjacent steps.
Footstep 15: Employ the Primer

Carefully utilise the primer from the middle outward. You don't desire to go across the edge of the flake. If you do, use a cotton fiber swab moistened with lacquer thinner to speedily wipe up the excess primer. Go along all of your painting supplies close at manus on a small tabular array. You don't want to have to go searching and fumbling later a fault as the paint doesn't stay liquid for long.
Step 16: Permit the Primer Dry

Let the primer dry to full cure, which could have a while depending on temperature and humidity. Be sure to follow the directions that came with your paint or repair kit, as they can advise you on the number of coats you lot'll demand for primer, paint, and clearcoat also as the amount of time each layer needs to dry. Budget enough time to allow the primer completely dry before covering it with paint.
Step 17: Wet Sanding

Once the primer dries, you can moisture sand it to set the primer base for pigment. In one case again, don't sand as well far from the center of the chip or you will sand through the surrounding clearcoat. Sanding through the clearcoat is peculiarly noticeable if your automobile has dark or metallic paint.
We recommend using a stronger, water resistant agglutinative for these wet sanding sticks. Information technology's non- removable, but you won't need to change sandpaper every bit often when wet sanding. We pre-made three sticks with sand paper circles on each end for a total of vi wet sanders.
Stride eighteen: Steady Hands

Painting a bit this large with a brush will never give you a mill finish, but you can at to the lowest degree seal the metal back up and make information technology look nice from further away. Steady hands and a small corporeality of paint on the castor worked best. Take it from your local manicurist: Thin, smooth coats are best when working with multiple layers.
Double- and triple-cheque that your primer is dry before you beginning this. While testing the PaintScratch kit, we made the mistake of painting too presently later a second coat of primer. The solvent in the paint began to deliquesce the primer and thin swirls of gray mixed into the white.
Step 19: Add Clearcoat

Keep wet sanding the painted spot until it is smooth. Adjacent, brush on the supplied clearcoat. Like the paint, clearcoat is lacquer based, thin, and it dries fast.
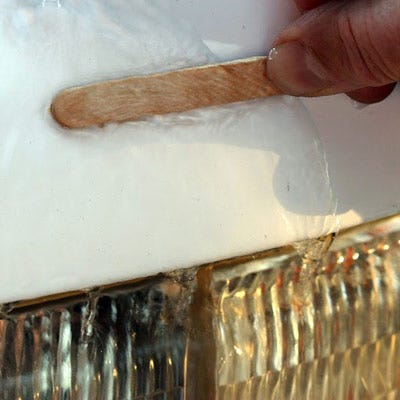
In this picture, you lot can come across the boundary betwixt the new lacquer and the original enamel. That happens when the edges of your repair aren't sanded down enough to taper into the chip. Be careful with your preparation piece of work, and get the scrap as smooth equally possible before you movement on to the next step. If you're happy with how your repair looks, though, you tin can skip ahead to Stride 21.
Footstep xx: Repair Your Repairs
If your repair didn't turn out well the first time, don't fret—at that place are ways to salvage it. Subsequently your previous attempt dries, sand the spot back downward to the primer with a 360-dust 3M Wetordry sandpaper. This time, it's imperative to stay inside the repair zone, and then you probably want to trim your sandpaper circle to sit even with the radius of your stick. Wipe off any actress grit or moisture, then repaint the spot. Wet sand the spot with g-grit sandpaper once the paint is completely dry. Add together your clearcoat, and then wet sand over again. This wearisome process slowly built upwardly new layers of paint to sit even with the original surface.
Pace 21: Utilise Rubbing Chemical compound

Once the repair is affluent with the rest of the paint, take some rubbing compound and polish the surface area with a clean cotton wool fabric. Wash the area with soapy water to clean off all the rubbing compound, rinse thoroughly, and let it dry out. Let the repair go on to cure for near a week earlier waxing your car.
Step 22: All Done

All done! Here is the same surface area where the large flake was, without any photoshopping. It won't fool a concours gauge, but it is a big improvement.
Of the products we tested, the Duplicolor pigment pen was the easiest to use on small fries. The colour didn't lucifer every bit well as the VIN-matched paint but it was a bargain at around $10. The $75.65 kit from PaintScratch was better for larger chips but required a tremendous amount of sweat disinterestedness and extra materials, plus the learning curve was steep. Information technology cost Paul about $150 in materials and nigh 20 hours of work to get his paint chips fixed at habitation, compared to a quote of most $300 to have his hood repainted.
Unless time is of the essence, simple paint chip repair is an easy enough task to try yourself. Take care of fries as soon as you tin! You're not only saving money on a full repaint, just on future repairs. Your pigment is your car's first line of defense from the elements, later all. Treat information technology equally such.
This content is created and maintained past a third party, and imported onto this folio to help users provide their email addresses. You may be able to detect more information about this and similar content at piano.io

Source: https://www.popularmechanics.com/cars/how-to/a6092/how-to-repair-chipped-car-paint/
Posted by: walkerweled1976.blogspot.com
0 Response to "Do It Yourself Car Paint Repair"
Post a Comment